How to compile Azerothcore 3.3.5a on Ubuntu 22.04

Roddan

Lurking around
Divine
Roddan Rep
0
0
0
Rep
0
Roddan Vouches
0
0
0
Vouches
0
Posts
276
Likes
101
2 YEARS
2 YEARS OF SERVICE
LEVEL 2 110 XP
Welcome to my guide on how to compile Azerothcore 3.3.5a on Ubuntu 22.04.
This was done on a Dedicated Server from Hetzner.


Step 1 - Downloading


  1. First all of you have to intall Ubuntu 22.04 obviously and download PuTTY or Termius, I prefer Termius due to it being so colorful and much easier to read & understand.
  2. You can find the download links below.
  3. PuTTY: Click me
  4. Termius: Click me (you can pay for Termius if you want, it's not needed!)
  5. I will be using Termius while doing this.

Step 2 - Getting Ready & Setting Up

  1. Launch PuTTY or Termius, one of the programs you decided to download and login with your credentials.
  2. Click Add at the top bar
    1672762899943.png
  3. Click New Host
  • 1672762923281.png
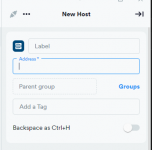
Now you will see this on the right side.
1672762958583.png
Enter your IP Address and Label you can name it whatever you want.
When you have entered your IP Address and your name on Label you will see this to your left.
1672763155513.png

Click on it and this window will open, login with your Username and Password.
1672763280362.png

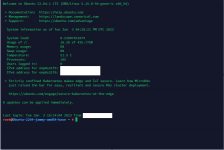
Now when you have successfully logged in you will see something like this.
1672763455150.png

Step 3 - Making a User

First of all we need to create a new user since we don't wanna do this as a root user.
Let's name our user azeroth, by adding a new user enter this.
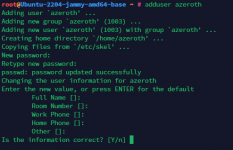
adduser azeroth
It will ask for a password, pick whatever you like. You don't have to enter your name, room, etc.
If you wanna skip everything after Password just hit Enter and when it ask you when the Information is correct type Y and hit Enter.
1672763723962.png
Now we can add our user to our sudo group so it will have Administrator Privileges and making the installation of the server much easier.
By doing so enter this:
usermod -aG sudo azeroth
Now we will use our user named azeroth instead of doing this as root. By switching over to our new user enter this:
su - azeroth
If you wanna go back to root user you can type:
sudo -i
When it ask for the password, it's the password of your new user not root password.

Step 4 - Necessary Server Requirements

Let's get started to install the Necessary Server Requirements to be able to Install & Compile and run the Server.
Copy & Paste this to install the necessary programs.
sudo apt update && sudo apt full-upgrade -y && sudo apt install git cmake make gcc g++ clang libssl-dev libbz2-dev libreadline-dev libncurses-dev libboost-all-dev mariadb-server mariadb-client libmariadb-dev libmariadb-dev-compat

Step 5 - Getting the Source Code & Compiling

Now copy this and insert it into the terminal so we can download and compile the core.
git clone https://github.com/azerothcore/azerothcore-wotlk.git --branch master --single-branch azerothcore
When it's done it will look something like this:
1672764290941.png

Now if you type ls into the terminal you will see a new folder called azerothcore
1672764321159.png
Now you have to enter the folder by doing so you type:
cd azerothcore
When you are inside the folder create a new folder named build. Type:
mkdir build
Now we have to enter that folder. By doing so type:
cd build
When you are in the folder enter this.
cmake ../ -DCMAKE_INSTALL_PREFIX=$HOME/azeroth-server/ -DCMAKE_C_COMPILER=/usr/bin/clang -DCMAKE_CXX_COMPILER=/usr/bin/clang++ -DWITH_WARNINGS=1 -DTOOLS_BUILD=all -DSCRIPTS=static -DMODULES=static
You can change /azeroth-server/ to whatever you like. This is where your server will be placed after it's done compiling. I usually name mine server.
It will look like this when it's done.

QC6ki9M.png


If you don't know how many CPU Cores your server has you can see that by typing:
nproc --all
Like this:
1672764520863.png
Now since I have 8 cores I can us 8 cores to compile server so it goes faster.
Inside the build folder type:
make -j 8
Remember to change the number to the amount of cores you have. You don't have to use them all. Example: If you have 4 cores but only wanna use 2 you type make -j 2
I'm gonna use 6 so make -j 6
Now you have to wait till it's done it will take a while depending on how fast your computer is.
When it's done it will look something like this.
lZdoEWk.png
Now you have to type make install and it will build the server.
When it's done it will look like this:
2Qg4hcb.png
 
Liked By 2 members :

Roddan

Lurking around
Divine
Roddan Rep
0
0
0
Rep
0
Roddan Vouches
0
0
0
Vouches
0
Posts
276
Likes
101
2 YEARS
2 YEARS OF SERVICE
LEVEL 2 110 XP
Step 6 - Getting The Server Ready
Now when the server is finished we can finally set it up with the database and data files.
Thankfully AzerothCore has all the dbc, maps, vmaps, mmaps and camera files already extracted and provided for us.
1. Now type cd to exit the folder and type cd azeroth-server or whatever you named the folder in with cmake prefix.
2. If you type ls you will see there is two new folders called bin and etc. Go into the bin folder by typing cd then make 2 new folders and name them data & logs.
3. Type mkdir data and mkdir logs.
4. Now type cd data to go into the data folder and type:
Wait for this bar to be 100%.
PbqStBi.png

To download the data. If you don't have ZIP installed type this:

sudo apt-get install unzip
When it's done downloading type unzip data.zip and it will unzip all the files and it will look like this:
ayZqqZp.png

Now you can type rm -r data.zip to remove the data zip file.
Now type cd to go back to your home folder and type cd azeroth-server/etc
This is the location of your config files.
Now type this to make a copy & change name of the 2 config files.
cp authserver.conf.dist authserver.conf
cp worldserver.conf.dist worldserver.conf
Don't remove the .dist files. Azerothcore wont work without them. Just let them be there don't edit them either.


Step 7 - Setting up the Database

Now you have to type sudo -i to get back to your root user and enter MySQL by typing this.
mysql -u root -p
When it asks for a password just hit enter since it don't have any by default.
Qh6PUj1.png
To setup our Username, Password and Database for the server enter this:
CREATE USER 'acore'@'localhost' IDENTIFIED BY 'acore' WITH MAX_QUERIES_PER_HOUR 0 MAX_CONNECTIONS_PER_HOUR 0 MAX_UPDATES_PER_HOUR 0;

GRANT ALL PRIVILEGES ON * . * TO 'acore'@'localhost' WITH GRANT OPTION;​
CREATE DATABASE `acore_world` DEFAULT CHARACTER SET UTF8MB4 COLLATE utf8mb4_general_ci;​
CREATE DATABASE `acore_characters` DEFAULT CHARACTER SET UTF8MB4 COLLATE utf8mb4_general_ci;​
CREATE DATABASE `acore_auth` DEFAULT CHARACTER SET UTF8MB4 COLLATE utf8mb4_general_ci;​
GRANT ALL PRIVILEGES ON `acore_world` . * TO 'acore'@'localhost' WITH GRANT OPTION;​
GRANT ALL PRIVILEGES ON `acore_characters` . * TO 'acore'@'localhost' WITH GRANT OPTION;​
GRANT ALL PRIVILEGES ON `acore_auth` . * TO 'acore'@'localhost' WITH GRANT OPTION;​

When it's done type exit or hit Ctrl + C.
Now go back to your other user by typing su - azeroth
Post automatically merged:

Step 8 - Setting up the Configs

Now go to your config folder:
cd azeroth-server/etc
After we have to edit our config file by typing nano authserver.conf & nano worldserver.conf
We will start with authserver.conf
Look for
LogsDir = ""
Between the " " marks enter this
/home/azeroth/azeroth-server/bin/logs
To save click Ctrl + X then hit Y

ztqYAvU.png

Now do the same for worldserver.conf
Remember to set the DataDir aswell!

Dzdtz8s.png


Step 9 - Starting the Server & Importing Databases.

With Azerothcore you don't have to manually import your Databases!
You just have to start the Authserver & Worldserver and it will do it for you.
So let's go back to our ETC folder.
1. Type cd then type azeroth-server/bin
2. Start the Authserver by typing ./authserver
3. Let it finish populating the Databases.
When it's done it will look like this:
cBrOHJK.png

Now hit Ctrl + C and do the same for your Worldserver.
1. Type ./worldserver
It can take a while to populate it. Sometimes it can look likes it's stuck but it's not just be patience :)
When it's done it will look like this:
xNrVmvV.png

Step 10 - Congratulations!
 
Liked By 3 members :

Lushen Japanese Blossom Tree

Dreamer
Divine
Lushen Rep
7
0
0
Rep
7
Lushen Vouches
0
0
0
Vouches
0
Posts
498
Likes
509
2 YEARS
2 YEARS OF SERVICE
LEVEL 8 26 XP
Awesome detailed guide! Kudos!
 
Liked By 1 member :

OMGhixD

Guest
Rep
Rep
Vouches
0
0
0
Vouches
0
Posts
0
Likes
0
Bits
56 YEARS
56 YEARS OF SERVICE
So happy to see such a well made tutorial for Linux based installations. We need to move people away from hosting on Windows :GIGACHAD:

Many thanks <3
 
Liked By 2 members :

Roddan

Lurking around
Divine
Roddan Rep
0
0
0
Rep
0
Roddan Vouches
0
0
0
Vouches
0
Posts
276
Likes
101
2 YEARS
2 YEARS OF SERVICE
LEVEL 2 110 XP
Thank you guys for the appreciation !! :)
 

PrivateDonut

Account Closed
banned
Rep
3
0
0
Rep
3
Vouches
0
0
0
Vouches
0
Posts
533
Likes
444
Bits
2 YEARS
2 YEARS OF SERVICE
LEVEL 31 71 XP
Amazing tutorial, I'm sure many will find this useful! :D
 

Instadev

MySQL & C++ Developer
banned
Instadev Rep
4
0
0
Rep
4
Instadev Vouches
0
0
0
Vouches
0
Posts
338
Likes
152
Bits
2 YEARS
2 YEARS OF SERVICE
LEVEL 2 90 XP
Thank you!
 
Liked By 1 member :

Roddan

Lurking around
Divine
Roddan Rep
0
0
0
Rep
0
Roddan Vouches
0
0
0
Vouches
0
Posts
276
Likes
101
2 YEARS
2 YEARS OF SERVICE
LEVEL 2 110 XP

3,389

1,271

9,555

428

Top