Etox
Gamer | NoobDivine
LEVEL 5
70 XP
Hey, so I wanted to share a guide I found way back and thought it might be useful to someone atleast it was for me!
Credits goes to Mahado (another forum)!
To start off!
// This is for the bonus which appears in the glyph
GlyphProperties.dbc
// This links the bonus to the Glyph Spell/Item
Optional
GlobalStrings.lua
// This modifies messages and textlines that you see in the game regarding the Glyphs
Player.cpp
// Modifies level requirements for glyphs (in this tutorial)
SpellEffects.cpp
// Modifies level requirements for glyphs (in this tutorial)
ItemClass.dbc
// This changes "Glyph" classification into something else
Step - 1 Selecting Glyph to Modify/Make
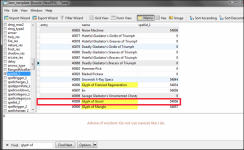
We'll make this easier by replacing current Glyph instead of creating new ones which is possible as well. Lets take "Glyph of Growl". EntryID: 40899 and its spellid 54856. This information can be found from item_template in the DB. You can rename it to something else like Glyph of Laziness. IMPORTANT NOTE: Don't use word "glyph" if you don't plan to use it, else you will have to rename it later on. Ex. Enchantment of Laziness

Step - 2 Renaming the Glyph Spell and Description
Open up Spell.dbc with your dbc editor. Once it is open, you make search for the spellid of growl, which was 54856. Then we wil column 137, put your item name there and then description at column 171. Do not close your spell.dbc yet.

Step - 3 Changing spell for the Glyph
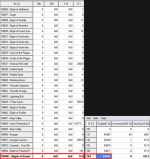
Keep Spell.dbc open still and go to column 111 <--- This points to GlyphProperties.dbc. Open up your GlyphProperties.dbc and go to the ID which the column 111 in spell dbc pointed to. Now, find any passive/talent or any spellid that you would prefer to use and place it in column 2. Use 14477 for example, which is +30 stamina. Save GlyphProperties.dbc and close it.

Step - 4 Modyfing the +30 Stamina Spell.
In Spell.dbc you can now go to modify the +30 stamina spell, search for the id of the spell and go to column 81 <-- this is the value for many passive spells, like the stamina. If I change it to 49, it would give me 50 stamina in-game. Change it or keep it, then go to column 137 and place your item name there again and description at column 171. Save spell.dbc and close it.
(NOTE: Changing values for every spell doesn't always go the same way).
Your glyph is ready for testing if you want. Place your .dbc files in your dbc folder and also pack them into the patch.
Optional Part:
This part is for those who wish to remove glyph level requirements and rename glyph from the game.
ItemClass.dbc
If we are going to do custom system of our own, we may want to classify it with something else than "glyph" Of course if you do this I recommend to rename your items in item_template and spell.dbc
Open your itemClass.dbc go to ID 16 which is glyph and rename column 4 to your liking.
Removing Glyph level requirements
Open up Player.cpp in core and search for line: void Player;InitGlyphsForLevel(), below that you will see these lines:
Change those values to your liking. In my version they are all at level 5 because I want them all to be available at max level.
Next, open up your SpellEffects.cpp and search for line: void Spell:EffectApplyGlyph(SpellEffindex effindex) below that you will see these lines:
Change those values to your liking as well.
Then you just recompile source.
Renaming messages/texts in-game
Open up your MPQ editor "Open Mpq" in filemenu and then go to enUS folder in your directory and open locale-enus.mpq. Go to -> interface -> FrameXML and extract GlobalStrin.lua
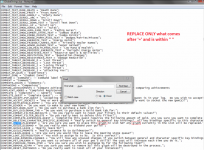
Open up GlobalString.lua with notepad and search for glyph, replace every string that contains word glyph with the classifcation that you chose in itemClass.dbc

Save it.
Final touches
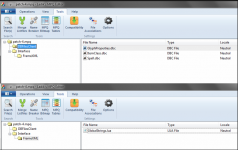
Make sure you have placed your dbc files in your servers dbc folder and that your patch looks like this:

Remember to place it in your data folder

ALL CREDITS GOES TO MAHADO
Credits goes to Mahado (another forum)!
To start off!
- You need a DBC Editor and a MPQ Editor!
- We also need these files:
// This is for the bonus which appears in the glyph
GlyphProperties.dbc
// This links the bonus to the Glyph Spell/Item
Optional
GlobalStrings.lua
// This modifies messages and textlines that you see in the game regarding the Glyphs
Player.cpp
// Modifies level requirements for glyphs (in this tutorial)
SpellEffects.cpp
// Modifies level requirements for glyphs (in this tutorial)
ItemClass.dbc
// This changes "Glyph" classification into something else
Step - 1 Selecting Glyph to Modify/Make
We'll make this easier by replacing current Glyph instead of creating new ones which is possible as well. Lets take "Glyph of Growl". EntryID: 40899 and its spellid 54856. This information can be found from item_template in the DB. You can rename it to something else like Glyph of Laziness. IMPORTANT NOTE: Don't use word "glyph" if you don't plan to use it, else you will have to rename it later on. Ex. Enchantment of Laziness

Step - 2 Renaming the Glyph Spell and Description
Open up Spell.dbc with your dbc editor. Once it is open, you make search for the spellid of growl, which was 54856. Then we wil column 137, put your item name there and then description at column 171. Do not close your spell.dbc yet.

Step - 3 Changing spell for the Glyph
Keep Spell.dbc open still and go to column 111 <--- This points to GlyphProperties.dbc. Open up your GlyphProperties.dbc and go to the ID which the column 111 in spell dbc pointed to. Now, find any passive/talent or any spellid that you would prefer to use and place it in column 2. Use 14477 for example, which is +30 stamina. Save GlyphProperties.dbc and close it.

Step - 4 Modyfing the +30 Stamina Spell.
In Spell.dbc you can now go to modify the +30 stamina spell, search for the id of the spell and go to column 81 <-- this is the value for many passive spells, like the stamina. If I change it to 49, it would give me 50 stamina in-game. Change it or keep it, then go to column 137 and place your item name there again and description at column 171. Save spell.dbc and close it.
(NOTE: Changing values for every spell doesn't always go the same way).
Your glyph is ready for testing if you want. Place your .dbc files in your dbc folder and also pack them into the patch.
Optional Part:
This part is for those who wish to remove glyph level requirements and rename glyph from the game.
ItemClass.dbc
If we are going to do custom system of our own, we may want to classify it with something else than "glyph" Of course if you do this I recommend to rename your items in item_template and spell.dbc
Open your itemClass.dbc go to ID 16 which is glyph and rename column 4 to your liking.
Removing Glyph level requirements
Open up Player.cpp in core and search for line: void Player;InitGlyphsForLevel(), below that you will see these lines:
// 0x3F = 0x01 | 0x02 | 0x04 | 0x08 | 0x10 | 0x20 for level 80
if (level >= 15)
        value |= (0x01      | 0x02);
if (level >= 30)
        value |= 0x08;
if (level >= 50)
         value |= 0x04;
if (level >= 70)
        value |= 0x10;
if (level >= 80)
        value |= 0x20;
Change those values to your liking. In my version they are all at level 5 because I want them all to be available at max level.
Next, open up your SpellEffects.cpp and search for line: void Spell:EffectApplyGlyph(SpellEffindex effindex) below that you will see these lines:
// Glyph sockets level requirement
uint 8 minLevel = 0;
switch (m_glyphIndex)
{
case 0:
case 1: minLevel = 15; break;
case 2: minLevel = 50; break;
case 3: minLevel = 30; break;
case 4: minLevel = 70; break;
case 5: minLevel = 80; break;
}
Change those values to your liking as well.
Then you just recompile source.
Renaming messages/texts in-game
Open up your MPQ editor "Open Mpq" in filemenu and then go to enUS folder in your directory and open locale-enus.mpq. Go to -> interface -> FrameXML and extract GlobalStrin.lua
Open up GlobalString.lua with notepad and search for glyph, replace every string that contains word glyph with the classifcation that you chose in itemClass.dbc

Save it.
Final touches
Make sure you have placed your dbc files in your servers dbc folder and that your patch looks like this:

Remember to place it in your data folder
- Start up your server
- Delete cache folder
- Go in-game and enjoy

ALL CREDITS GOES TO MAHADO


